


Frequently Asked Questions
General Information about Smart Tiles
What is the origin of Smart Tiles?
Smart Tiles are the answer to the call of many DIY enthusiasts looking for efficient, affordable, and easy-to-use interior design options. These revolutionary self-adhesive tiles, invented by Smart Tiles 25 years ago and entirely manufactured in Canada, are designed for use as wall tiles.
What exactly are Smart Tiles?
Smart Tiles are a type of self-adhesive tile that sticks to your wall without the need for additional glue. They are designed to last, staying in place for as long as you want. They are equipped with our patented Gel-O, a translucent gel that ensures the tiles will never yellow or crack.
What is the concept of Smart Tiles?
They follow the "peel and stick" principle, making them suitable even for beginner DIY enthusiasts. They are lightweight, which makes them easy to handle, cut, and maintain. Smart Tiles can be installed in minutes on a smooth and clean surface without the need for specialized tools.
What are the advantages of Smart Tiles?
In addition to their easy installation, Smart Tiles offer numerous benefits. They are specially designed to withstand heat and humidity. They feature patented technology ensuring impeccable quality and exceptional durability. Moreover, they are designed, created, and produced in North America with a strong emphasis on environmental sustainability and the durability of our supply chain. Finally, they have various certifications, including fire resistance and low volatile organic compounds (VOC) emissions.
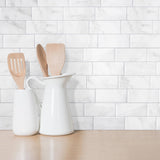
Can we distinguish Smart Tiles from ceramic or glass tiles?
It is entirely understandable to wonder if one can notice a difference between Smart Tiles and ceramic or glass tiles. After all, when it comes to decorating your home, every detail counts.
Certifications, warranties and durability
What certifications do Smart Tiles products have?
Smart Tiles products are certified for fire resistance (NFPA, ASTM E84, and IBC Class B). Our products have also received the A+ certification for the emission of volatile organic compounds and aldehydes under the ISO 16000 standard. This standard classifies emission levels from A+ to C (A+ indicating a very low level of emissions and C indicating a very high level).
Do Smart Tiles withstand heat, humidity, and water?
Increasingly popular for interior decoration due to their easy installation and modern design, Smart Tiles raise questions about their resistance to heat, humidity, and water.
Heat resistance: Smart Tiles are designed to withstand the heat from stoves once properly installed. It is important to follow our installation requirements to ensure optimal heat resistance.
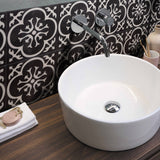
Moisture resistance: Smart Tiles are also designed to withstand moisture from bathrooms and water splashes once properly installed. Again, be sure to adhere to our installation requirements.
Water resistance: Regarding water resistance, Smart Tiles can withstand water splashes and humidity once properly installed. However, they should not be installed on a surface directly exposed to water, such as a shower cabin, as this could affect their adhesion.
What are the details of the warranty offered on our products?
Smart Tiles products come with a warranty against manufacturing or design defects for a period of 30 days from the date of purchase. For more information, please visit our dedicated page here or our general terms and conditions of sale.
How to ensure the durability of Smart Tiles?
Smart Tiles are renowned for their long-term durability, thanks to their ability to maintain their appearance without yellowing or cracking. Furthermore, we promise that your Smart Tiles will stick to your wall for as long as you desire! However, to ensure this durability, it is essential to follow Smart Tiles' specific recommendations:
How can I clean, maintain, and upkeep my Smart Tiles?
Want to keep your Smart Tiles in perfect condition? Here are some simple tips for effectively cleaning, maintaining, and caring for your adhesive tiles.
- Use a soft sponge: To restore the shine to your Smart Tiles, use a soft sponge soaked in warm water. Avoid using abrasive sponges that could scratch the surface of the tiles.
- Choose the right cleaning products: Opt for mild, non-abrasive household products such as dish soap, cream cleaner, or glass cleaner. These products will help remove dirt and stains without damaging the surface of the tiles. If your Smart Tiles are installed near your fireplace, you can use an orange cleaner.
- Avoid harsh cleaners: Avoid using strong cleaners or aggressive chemicals that could react negatively with the tile surface. These products could not only damage the finish of the tiles but also compromise the validity of the Smart Tiles warranty.
It's also important to note that some spices rich in colorants like turmeric can permanently stain the tiles.
Let's build your project together
How to get advice from an interior designer to choose the best model?
Getting professional advice to choose the best Smart Tiles model can make a big difference. Whether you're renovating your home or simply looking to modernize your space, we have a solution for you.
Our interior design consulting service is here to assist you in your choices. To benefit from it, it's simple! You can contact us via email at the following address: decorateur@thesmarttiles.com.
In your email, feel free to provide us with as much detail as possible about what you're looking for. For example, the style you prefer (modern, classic, bohemian, etc.), the type of room you want to decorate. The more information we have, the better we can assist you.
How to calculate the number of tiles needed for my project?
If you're considering a renovation or construction project, whether it's for the bathroom or even your kitchen, it's important to know how many tiles you'll need. This will help you estimate the cost of your project and complete it as quickly as possible.
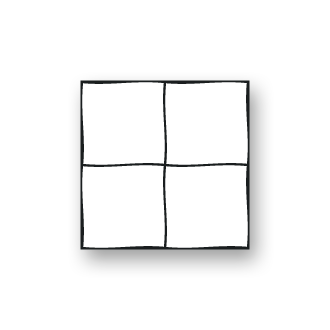
Measure the surface to be covered
The first step is to measure the surface you plan to cover. Use a tape measure to measure the width and height of the surface. If the surface to be covered is not a perfect rectangle, try to divide it into smaller sections that are rectangles or squares and measure these sections individually.
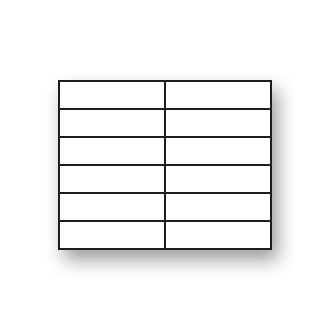
Use our tile calculator
Once you have measured the surface to be covered, enter the information into our tile calculator. This calculator is available on each product page of our website and will help you estimate the number of tiles for your project.
Enter the width and height of each section into the appropriate fields of the calculator as illustrated on our calculator. It will give you an estimate of the number of tiles needed. Please note that the Smart Tiles calculator automatically adds a 10% markup to account for minor incidents during installation (cuts, breakages, etc).
Preparation and Installation
How to prepare my surface for Smart Tiles installation?
To ensure successful installation, it is imperative that Smart Tiles are applied to a smooth, even, clean, and dry surface. For cleaning the surface, make sure to use a degreasing product (sodium bicarbonate for example). We do not recommend using dish soap, which could leave a slight greasy film on your wall and compromise the adhesion of Smart Tiles.
If your surface is not smooth and/or even, you need to properly prepare the surface you will be working on. First, make sure to fill in any gaps between panels using plaster to achieve a surface that promotes optimal adhesion.
Next, apply a coat of primer to the entire prepared surface. Let the primer dry for 72 hours to allow for perfect bonding of the coating. If you prefer to use paint instead of primer, make sure to wait for 21 days to ensure complete drying before proceeding with installation.
By following these preparation steps, you ensure an ideal surface for your Smart Tiles.
How to install my Smart Tiles around an electrical outlet?
To install your Smart Tiles around an electrical outlet, start by measuring the outlet and transferring the measurements onto the tile. Then, use a retractable blade knife to cut the tile according to the measurements taken. Once the cut is made, apply the tile to the wall, making sure to fit it snugly around the outlet. If you encounter difficulties during this step, feel free to consult our detailed tutorial video on installing Smart Tiles around electrical outlets: https://www.youtube.com/watch?v=51vJ0J23oWM.
How to install my Smart Tiles on a wall with a concave or convex angle?
If you want to install your Smart Tiles on a wall with a concave or convex angle, here's what you need to do.
When dealing with a concave angle or a curved wall, our Smart Tiles are flexible enough to be installed directly.
When encountering a convex angle, make sure not to cut the Smart Tile in half. It's better to make a shallow cut and place the tile directly on the angle. This method helps avoid unnecessary pressure on the Gel-O.
To visualize this technique, we recommend watching our explanatory video that will guide you step by step in installing Smart Tiles on curved or angled surfaces: https://www.youtube.com/watch?v=51vJ0J23oWM.
How can I ensure that my Smart Tiles are aligned during installation?
To properly align your Smart Tiles during installation, follow these simple steps:
Mark the wall
Use a level to draw a horizontal line at the height of the first row of tiles. This will serve as a guide to maintain the alignment of your tiles during installation.
Realign the tiles if necessary
Our Smart Tiles come with a specially formulated adhesive that allows for repositioning during installation if firm pressure has not been applied. So, you can easily peel them off the wall to reposition them correctly without risking damage to the product or the wall.
Do I need to add caulking between my tiles and my countertop?
Do I need to add caulking between my tiles and my countertop?
How can I use Smart Edge for a perfect finishing border?
Our Smart Edge adhesive strips allow you to create an elegant finishing border for your Smart Tiles. By adding a refined final touch, they enhance the aesthetics of your peel-and-stick tiles. Available in various designs, Smart Edge matches perfectly with the colors of your tiles.
Designed with the same principles as Smart Tiles, Smart Edge strips are easy to handle, cut, and install. This makes the installation quick and hassle-free.
Is removing Smart Tiles easy?
If you need to remove Smart Tiles after installation, don't worry! The tiles are equipped with a specially designed adhesive that allows for repositioning during installation if firm pressure has not been applied. If firm pressure has been applied or if more than 48 hours have passed, the tiles can be removed practically without damage, depending on the surface they were initially installed on. To facilitate the process, heat each tile with a hairdryer to soften the adhesive, then start gently pulling on each corner. Next, use a cleaning product to wash the wall and remove any excess glue left by the Smart Tiles. The ease of removing Smart Tiles makes them your preferred ally for all your decoration projects, even if you are a tenant!
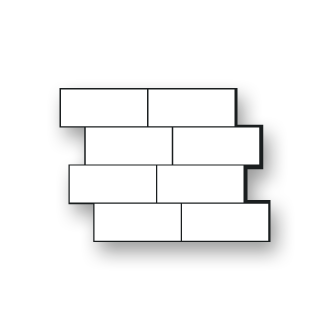
What do the letters/numbers printed on Smart Tiles mean and how to use them effectively?
The letters and numbers printed on Smart Tiles are only there for production purposes and should not be visible once the tiles are installed on the wall. To determine the desired pattern of your Smart Tiles, we recommend arranging them on your workspace before fixing them to the wall. During installation, ensure that the letters and numbers overlap along the grout lines so they are not visible once installed. It is important not to cut them as it would compromise the proper installation of your Smart Tiles.
Installation Surfaces
On what surfaces can I install my Smart Tiles?
Smart Tiles can be installed on various indoor surfaces as long as they are smooth and even. Here is a list of ideal surfaces for Smart Tiles installation:
- Painted drywall (after a waiting period of 21 days if the paint is fresh)
- Smooth ceramic tile
- Acrylic wall panel
- Wall linoleum
- Mirror
- Wallpaper and wallpaper
If your surface is not listed here or if it is not perfectly smooth, we ask you to follow our detailed preparation prerequisites outlined in the article 'How to prepare my surface for Smart Tiles installation'.
On what surfaces should I not install my Smart Tiles?
Certain uneven or porous surfaces should be avoided when it comes to installing Smart Tiles. Also, your Smart Tiles shouldn't be installed outdoor.
Here is a list of surfaces on which your Smart Tiles should not be installed:
- Textured wall
- Unpainted drywall
- Porous wood
- Textured ceramic tiles
- Textured wallpaper
- Inside shower
- Floor
- Countertop
- Ceiling
- Brick
- Stone
In general, textured or uneven surfaces, as well as surfaces with relief, do not allow Smart Tiles to adhere optimally. Therefore, it's important not to install them on such surfaces. In some cases, it may be possible to smooth the surface by sanding it and applying a primer (letting it dry for 72 hours). To help you prepare your installation surface, you can refer to our detailed article 'How to prepare my surface for Smart Tiles installation'.
Can I install my Smart Tiles around a fireplace?
Smart Tiles can be installed on a surface with a temperature not exceeding 49°C (120°F). However, it is important to avoid direct contact with a heat source, as well as direct exposure to an open flame. Therefore, you can install them around the fireplace. Please note that if your fireplace is not 100% a tight seal and fumes are escaping, your Smart Tiles might burn or yellow.
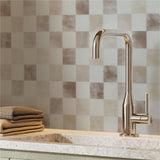
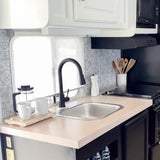
Can I install my Smart Tiles behind a stove or gas cooktop?
Yes, Smart Tiles can be installed behind a stove or gas cooktop as they are heat-resistant. However, it is important to follow certain recommendations. If your stove does not have a rear control panel or metal plate, you should leave a safety zone of 8 inches without Smart Tiles behind your stove or cooktop to avoid contact with the flame.
To avoid direct exposure to steam, ventilation, or an open flame (in the case of gas stoves), we recommend installing our Smart Panel.
If you have countertop appliances such as ovens, toasters, or toaster ovens, keep a space of 2 inches between the peel-and-stick tiles and the appliance. It is also important to note that some spices rich in colorants like turmeric can permanently stain the tiles.
Can I install my Smart Tiles in a shower?
Our tiles are designed to withstand heat and humidity, making them suitable for bathrooms. However, it is not recommended to use them directly in the shower or bathtub, where they would be exposed to large amounts of water, and if the installation is not done correctly, leaks could occur. They can be used in areas only exposed to water splashes. If you want to apply them above the shower wall, make sure the surface is completely dry before installation to ensure optimal adhesion.
Can I install my Smart Tiles over existing tile?
You can install Smart Tiles adhesive wall tiles directly over your old backsplash, whether it's glass or ceramic, as long as the surface is smooth and texture-free. It's important to consider the width and depth of your existing grout lines, as this could affect the final outcome of the installation.
Some designs of textured tiles may make underlying textures more apparent. To avoid surprises, we recommend testing with one or two Smart Tiles before covering the entire wall.
Finally, some Smart Tiles models have specific recommendations. You can check our dedicated page for more information: https://www.thesmarttiles.com/installation
Installing Smart Tiles in a rental property
Smart Tiles are indeed an ideal solution for revitalizing your rental property. Their ease of installation allows for easy application and removal without leaving any traces when you move out. Therefore, you can install them in your rental property to personalize your space without compromising your security deposit.
Ordering and Payments Methods
Where can I buy Smart Tiles products?
You can purchase Smart Tiles products in various ways.
Online: You can find a wide selection of Smart Tiles products on our official website or on popular online selling platforms. Buying online allows you to browse through our different models, sizes, and colors and place your order with just a few clicks, without having to leave your home.
In-Store: Smart Tiles are also available in most major home improvement stores, where you can find them in the wall covering or kitchen and bathroom accessories section.
Whichever option you choose, purchasing Smart Tiles is simple and convenient, allowing you to easily and quickly transform your interior spaces with style and functionality. Don't wait any longer, find a retailer to purchase your Smart Tiles today.
What payment methods does Smart Tiles accept?
What payment methods does Smart Tiles accept?
Can I order Smart Tiles samples?
Each product page features a dedicated button that allows you to order samples. It is important to note that our samples have dimensions of 10 x 10cm.
You have the option to order up to 6 samples and enjoy free delivery for this quantity. Beyond 6 samples, delivery charges will apply. This option allows you to visualize and compare the different models and colors available, ensuring that you make the best choice for your decorating project. Don't hesitate to take advantage of this opportunity to be fully satisfied with your Smart Tiles purchase!
Deliveries, Order Cancellations and product returns
What is the estimated delivery time for my order?
What is the estimated delivery time for my order?
What are the customs or import fees to expect for my order?
When making a purchase and selecting delivery to Canada, the United States, or the European Union, no customs or import fees apply. However, if you choose delivery to another country, please note that customs or import fees may apply and are your responsibility. Therefore, be sure to inquire before making your purchase.
How can I cancel my order?
To cancel your Smart Tiles order, follow these steps:
1- Go to your Smart Tiles customer account
2- Find the order you wish to cancel
3- If the order has not yet been shipped, you will have the option to cancel it directly from your customer account
4- Follow the instructions to confirm the cancellation of the order
Please remember that only orders that have not been shipped can be canceled. If your order is already in transit, please refer to our article 'How can I return my order?'
How can I return my order?
If you made a purchase on our website, it is possible to return or exchange a product within 30 days of receiving the order. However, please keep in mind that some products may be excluded from this policy, such as those purchased during final sales or those for which it is clearly stated that returns are not accepted.
To return a product purchased online, please follow the procedure below: first, contact our customer service at info@thesmarttiles.com to obtain a return authorization number. This number is essential to ensure the efficient processing of your return. Once you have received this number, please carefully package the product to be returned and include all original parts, accessories, and packaging.
Ensure that the returned product is in perfect condition and has not been used. Once your package is ready, please send it to the address specified when requesting the return authorization number. Upon receipt of the package, our team will inspect the returned product and inform you of the status of your refund or proposed exchange.
If you made a purchase in-store, please note that specific return policies for that establishment apply.
Can I return my samples?
Unfortunately, the sale of samples is considered a final sale. This means that once you have purchased samples, it is not possible to return them or obtain a refund. If you have any doubts or questions, feel free to contact customer service for additional clarification before placing your order.
Information for professionals
How to become an authorized Smart Tiles distributor?
As a retailer or decorator, it's essential to be able to distribute quality products to your clients. If you wish to distribute our products and benefit from exclusive discounts, early access to new releases, or our Smart Tiles Pro newsletter, follow these steps:
- Visit our dedicated professionals page.
- Fill out the registration form: Once registered on our professional page, fill out the registration form to become an authorized distributor. Make sure to provide all the required information, including your contact details, type of business, and registration documents.
- The Smart Tiles Pro team validates your registration.
- Start shopping now with your Pro account!
How to become a Smart Tiles affiliate?
Nothing could be simpler: visit our page become an affiliate
